Announcement

Collapse
No announcement yet.

Help Needed...Bulging Shower Wall--Round 2

Collapse

Forum Top GA Ad Widget

Collapse
X
 
  • Filter
  • Time
  • Show
Clear All
new posts

  • Help Needed...Bulging Shower Wall--Round 2

    Hey Gang....

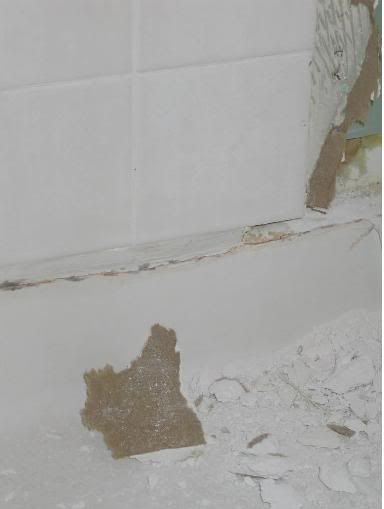
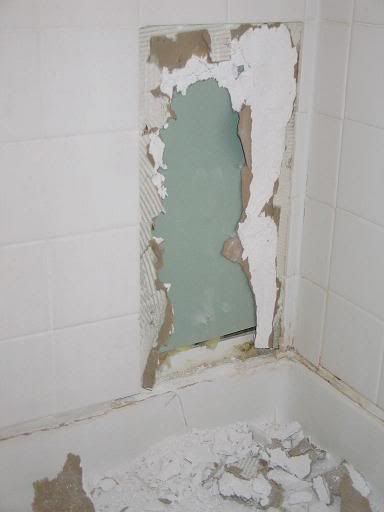
    I finally started tearing out the tile and drywall in an attempt to figure out what was causing an area of my shower wall to "bulge". This bulge has been present since I purchased this home and I finally got tired of looking at it. I have attached two pictures (1 showing the area I removed, 2 showing the amount of "bulge"). I have listed my questions below:

    1. Why is there a layer of sheetrock and then the green sheetrock?
    2. I can see that the sheetrock is bulging but it doesn't appear to be water damaged at all. Any ideas?
    3. The area beneath the last tile had what appeared to be a piece of wood or something there between the tile and the showerpan to fill the gap in depth. Any idea what this is? Whatever it was it crumbled and broke so I will have a big deep gap there after fixing the wall. The bottom picture shows what i'm talking about...whatever it is has caulk over it.
    4. Lastly...anyway I can salvage and reuse these tiles?

    Thanks Much!
    JP


  • #2
    First of all it appears that the walls are built out so far that there is hardly any apron remaining on the tub.

    By current code standards the entire installion is a comedy of errors.

    The current plumbing codes strictly prohibit both standard wall board (Sheetrock) and Water resistant wallboard (Greenboard) in the shower enclosure area. (Water resistant wallboard may be used behind preformed one piece tub/shower units with a written approval of the local inspecting authority.)

    Tilebackerboard (cement hardboard) must be installed in the shower or tub/shower enclosure area until it reaches a height of 72" above the finished drain. (International Residential code IRC 307.2 & Uniform Plumbing Code UPC 807.1.3)

    Cement Backerboard requires house wrap building paper backing on the studs before applying the backerboard (IRC-per manufacturer or local code spec & UPC 807.1.3)

    All joints must be coated with a water resistant sealant (IRC 702.4.2 & UPC 807.1.3).

    All other wall surfaces in the bathroom are to be covered with water resistant wallboard (greenboard)

    Water resistant wallboard IS NOT to be installed over a vapor barrier membrane (IRC 702.4.3 & UPC 2512)

    Water resistant wallboard IS NOT to be installed on a ceiling if the framing is spaced greater than 12" on center (IRC 702.4.2 & UPC 2512)

    Ceramic tile may be applied directly on water resistant wallboard (not in a shower enclosure). (IRC 702.4.1 & UPC-check local code).


    If you work very carefully it is possible to recover most of the existing tile, but experience has taught me that you must expect about 20% loss and in most cases the labor required to clean the tile sufficiently to reuse it is cost prohibitive.

    Before replacing the wallboard you may want to pull a string from corner to corner across the stud faces to see if the existing studs are true. If not, you can sister new studs to the existing studs to establish the proper depth from the tub and insure a true vertical and horizontal surface.

    Comment


    • #3
      Lazy Pup--

      Thank you for the information. Upon removing the green wallboard I found the culprit. There is a Vent pipe very close to the shower pan. The persons who put the wallboard up apparently didnt' care and put it on anyways...this is causing a bend in the drywall. I will be moving the vent pipe closer to the wall but there is one problem I'm needing help with. On the left hand side I am now to the stud so I can reattach a drywall patch. On the right hand side the nearest stud is right behind where two walls come together so its not really accessable. Any suggestions?

      Comment


      • #4
        While the existing installation obviously doesn't meet current code approval if your household is like mine, the budget just won't reach a complete redo without a bit of preplanning, therefore you will no doubt have to consider making this a maintenance job for the time being.

        With that in mind, i would begin by cutting out the damaged section as square as possible.

        In most instances when repairing sheetrock it is difficult to make a joint between the repair sheetrock and the existing sheetrock on the existing studs. A simple solution is to sister in a short cripple stud to make a nail surface for the new sheetrock. To do so you cut a short piece of stud a couple inches longer than the vertical section to be repaired. Slip it into the wall cavity and screw it to the existing stud. You can then screw the new sheetrock to the cripple on either end. Mud and tape the joints, then apply your finish.

        Comment


        • #5
          Fantastic..should work like a champ! And lastly..the area between the shower pan and the bottom of the last row of tiles what is that thing that was inserted and caulked over called? The second picture I attached should help you see what I'm talking about, whatever it was crumbled. Thanks so much!

          PS--You are correct, I had an estimate of nearly $2800 to redo the entire shower enclosure. Hard to believe a home less than 5 years old would have had such sloppy shower construction. Moving the vent line should be fun.

          Comment


          • #6
            You may not need to actually move the vent. In the picture the greenboard is against the studding and the back of the shower pan was installed against the green board, therefore the vent should be clear of the actual shower pan. You then have a second layer of wallboard on top of the greenboard which extends over the lip of the shower pan about 1/2".

            Consider installing a cripple stud on each side of the opening leaving the face edge of the cripple 1/2" proud (further out) of the existing stud to compensate for the greenboard layer. That will give you another 1/2" front to back clearance and you should then be able to bridge the new wallboard across the opening and clear of the vent.

            It is difficult to tell what they used on that base, but given that you say it crumbled i would suspect the tile installer used grout to form a bullnose. The problem with that is that grout is not waterproof so if it is not then properly sealed, in time moisture will be absorbed into it and cause it to crumble. Once the bullnose crumbles moisture will then be absorbed into the base of the wallboard and cause additional problems.

            When you install the new piece of wallboard make sure the bottom edge of the wallboard is about 1/2" above the shower pan and allow the bottom row of tile to extend over the edge of the wallboard. That minor elevation of the wallboard will prevent the wallboard from leaching up any moisture that may get into that cavity.

            Whatever that material is, the fact that it is crumbling indicates it is not holding up well in this application. I would consider removing it all the way around the enclosure, then perhaps install a strip of ceramic bullnose and caulk it all with a good TUB/TILE silicone caulking.


            Comment


            • #7
              Very very good suggestions, I will implement them and if my workmanship isn't embarassing I'll post after pictures. Thanks so much.

              Comment


              • #8
                LazyPup---

                Thanks again for your suggestions..worked like a champ. As you said getting the old stuff off the tiles is very labor intensive. I think I will just shop around and attempt to match them. Also, do I need to tape/seal the joint between the new wallboard and the old? Thanks!

                Comment


                • #9
                  The plumbing code requires all cut edges to be sealed with a water repellant sealer. In most instances the easiest method it to mud and tape the joints then apply a primer over the joint.

                  Comment

                  Working...
                  X