-
MONITOR Burner mat
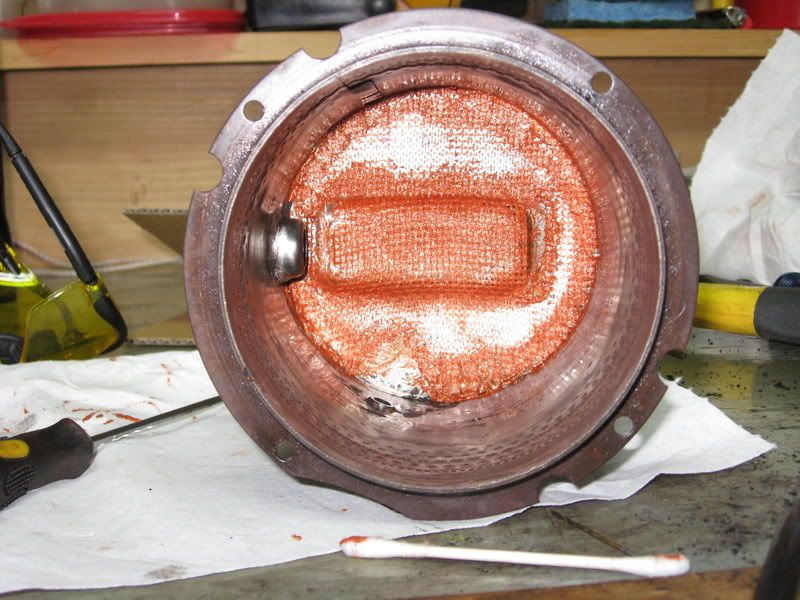
The way you got your burner mat is wrong! It's shaped like a D with the rounded part near the left rear side. the cut-out for the U shaped channel goes under the channel. your photo shows the mat covering the whole thing - not correct!Leave a comment:
-
Well, finally got the time to start putting the Monitor back together. There was about 3/4" of carbon build up in the burner pot where the k1 comes in. Man that stuff didn't go without a fight either. It was a combination of chiseling and the dremel that finally got it relatively clean. Just finished putting the burner mat in. I used some Permatex Ultra Copper for the glue. Im a little apprehensive though because on the back it says "not for surfaces in contact with gasoline". I also ended up having to basically smear the stuff all over my fresh burner mat in order to make sure all of the edges are glued down. I have no idea how this will effect the performance. As of now the glue has to cure overnight and hopefully it will get a test run tomorrow night.
Here is a picture of what my glued down mat looks like.
Leave a comment:
-
Thank you very much for all of your help sir.
I have the service manual, however it does not specify certain things, hence the questions. Thanks very much for your help.Leave a comment:
-
no orientation two wires are for the fan motor the other two are for the damper solenoid. only thing dc on the unit is the supply for the computer board.Leave a comment:
-
Thanks HayZee, I thought this, the combustion fan, was the problem. 2 of the 4 wires going to the fan are separate, does their orientation matter, positive / negative.Originally posted by HayZee518 View Post
Thanks again.Leave a comment:
-
Testing Monitor 41..
Can the M41 be tested without a direct connection to an external fuel supply? IE. With a small container of K1 and hose going to the fuel supply inlet.
Powers up, igniter is getting hot, combustion fan does not come on, however it does get warm, turn freely by hand and there is voltage going to the combustion fan leads.
Thank you.Leave a comment:
-
There's more:
Click, click, click. Your Monitor heater has a solenoid pump, about the size of a marking pen, that operates quietly when fuel is present at the fuel sump. If your tank ran out, or there are air pockets in the supply line, then you will hear the fuel pump click, click, click. That is the sound of a fuel pump without fuel. The red button reset (not a primer) at the lower right side of your Monitor heater releases a magnetic valve that may be stopping your fuel. If so, you will hear the click click go to clunk clunk and thump thump as fuel reaches the pump. If air in the line prevents fuel reaching the heater, it will need to be bled from the line to bring a steady fuel supply to the heater. This is not a heater problem. It is a fuel supply problem.
Heater won’t start. Is it plugged in? Does the indicator light illuminate? Do your hear the hum of the combustion fan, but nothing else happens? Find the air switch. It is cookie size, stands on edge near the front of the same compartment as the Constant Level sump. The air switch has a micro switch with two wires attached. When this switch closes, it tells the control board all is well (the combustion fan is bringing air into the combustion chamber). What activates this switch is the rubber air hose attached to the cookie size air diaphragm. Occasionally, this diaphragm fails, but more often it stops working because the rubber air hose is split, right at the end attached to the air switch assembly. This split rubber hose will prevent the heater from starting the burn. You could go to the trouble of ordering Monitor part number XXXX, but why bother? I use 3/32”automotive vacuum hose, from the auto parts store. Quicker, cheaper, lasts longer. Clear silicone tubing is NOT recommended.
Starts up, shuts down. Does the fuel come to the heater, but is blocked from the combustion chamber? It is easy to check. Where the small copper fuel line enters the combustion chamber, it may be inspected. Use a 13 mm open end wrench, or small adjustable wrench, disconnect the line from the combustion chamber. The line pulls out, and so do the washer and rubber spacer; don’t lose them. The fuel line itself does not clog, but carbon may build up on the tube that goes into the chamber, partially blocking fuel from getting to where it needs to be. If this is the case, the symptom will be start up and shut down, with an error code of flame failure. Essentially, it ran out of fuel. A drill bit may be too short, but a piece of bailing wire 3 inches long (I use a bicycle spoke) will be enough to push carbon out of the way at the far end of the fuel inlet. If carbon is blocking the inlet, you will feel it as it pushes out of the way. If there is no resistance at all, there was no blockage. While this is not the condition with every heater that stops, it is easy to check, and it is easy to overlook. Put it back together, and move on to the next common problem.
Flame failure. The flame rod is telling the control board to shut down the heater. Why?
The flame rod has a job to do, and while it is not a union job, it requires very specific working conditions. When the heater is operating, you may be able to look into the inspection window, down and to the right. To see it in its working position when the heater is not operating (and cool), remove the window base panel (10 screws, the panel 4 by 7 inches on the front of the combustion chamber. If the gasket goes to pieces, replace it with Monitor part number 6850, about $16). The flame rod is to the right and below the opening. Use a flashlight to see where it is, between the burn chamber wall and the burn ring. In this half inch opening, it should be centered. If there is carbon build up (a carbon bridge) from the rod to either side, the heater will shut down. If the burn ring is very near the rod, it may touch it as the heater warms up, and the heater will shut down.
How does the flame rod work? It conducts electrical current through the flame itself to the board, telling the control circuit the flame is present and all is well. If the rod shorts out by carbon, or by touching the metal on either side, the signal to the control circuit is that all is not well, and the board responds by shutting the heater down. The burn ring, or combustion ring, looks like a cereal bowl upside down in the middle of the heater. It is stainless steel, and glows red hot in heater operation. New, it starts out perfectly round, but may warp over time. If the warp is wide at the flame rod position, and touches the rod, that condition can shut down the heater.
@@@
Proceed to Level Two?
jimmyj55.com is restocking Monitor parts for the season, for all those who insist (by intent or by desperation) on repairing their own heaters.Leave a comment:
-
that'll be nice! I got the pdf saved on an external zip drive so I'll never lose it! the voltage test points are a real help. thing is now if the board craps out, they don't make a replacement board. I've repaired boards before like on commercial dryers for a laundromat so obtaining parts isn't real hard. Mouser electronics in texas is a good supply point. Newark is another place. Allied is also in texas and they are the parent company to radio shack. McMaster Carr is a good place for gaskets. their silica woven gaskets fit the bill and are rated higher for temperature than the original parts from monitor. the burner mat I changed out a week ago, was still intact but I replaced it anyways with that new material I got - the acryllic fiberglass.Leave a comment:
-
Glad to hear you got it working HayZee. As for me Im wrapping up some stuff on my vehicles before winter, then Im going to start putting the monitor back together. I picked up a new burner mat for it and a couple new gaskets. In all it cost about 50 dollars, the mat was actually pretty cheap, its those damn gaskets that are expensive. Anyway I will take some pics thoughout the process so people can see whats going on.Leave a comment:
-
original poster - have d/l the pdf file it's really great! thanks to you!Leave a comment:
-
Flame Rod Operation
There's a good explanation of flame rod operation at www dot durag dot com/html/heg/heglit dot htmlLeave a comment:
-
Click, click, click. Your Monitor heater has a solenoid pump, about the size of a marking pen, that operates quietly when fuel is present at the fuel sump. If your tank ran out, or there are air pockets in the supply line, then you will hear the fuel pump click, click, click. That is the sound of a fuel pump without fuel. The red button reset (not a primer) at the lower right side of your Monitor heater releases a magnetic valve that may be stopping your fuel. If so, you will hear the click click go to clunk clunk and thump thump as fuel reaches the pump. If air in the line prevents fuel reaching the heater, it will need to be bled from the line to bring a steady fuel supply to the heater. This is not a heater problem. It is a fuel supply problem.
Heater won’t start. Is it plugged in? Does the indicator light illuminate? Do your hear the hum of the combustion fan, but nothing else happens? Find the air switch. It is cookie size, stands on edge near the front of the same compartment as the Constant Level sump. The air switch has a micro switch with two wires attached. When this switch closes, it tells the control board all is well (the combustion fan is bringing air into the combustion chamber). What activates this switch is the rubber air hose attached to the cookie size air diaphragm. Occasionally, this diaphragm fails, but more often it stops working because the rubber air hose is split, right at the end attached to the air switch assembly. This split rubber hose will prevent the heater from starting the burn. You could go to the trouble of ordering Monitor part number XXXX, but why bother? I use 3/32”automotive vacuum hose, from the auto parts store. Quicker, cheaper, lasts longer. Clear silicone tubing is NOT recommended.
Starts up, shuts down. Does the fuel come to the heater, but is blocked from the combustion chamber? It is easy to check. Where the small copper fuel line enters the combustion chamber, it may be inspected. Use a 13 mm open end wrench, or small adjustable wrench, disconnect the line from the combustion chamber. The line pulls out, and so do the washer and rubber spacer; don’t lose them. The fuel line itself does not clog, but carbon may build up on the tube that goes into the chamber, partially blocking fuel from getting to where it needs to be. If this is the case, the symptom will be start up and shut down, with an error code of flame failure. Essentially, it ran out of fuel. A drill bit may be too short, but a piece of bailing wire 3 inches long (I use a bicycle spoke) will be enough to push carbon out of the way at the far end of the fuel inlet. If carbon is blocking the inlet, you will feel it as it pushes out of the way. If there is no resistance at all, there was no blockage. While this is not the condition with every heater that stops, it is easy to check, and it is easy to overlook. Put it back together, and move on to the next common problem.
Flame failure. The flame rod is telling the control board to shut down the heater. Why?
The flame rod has a job to do, and while it is not a union job, it requires very specific working conditions. When the heater is operating, you may be able to look into the inspection window, down and to the right. To see it in its working position when the heater is not operating (and cool), remove the window base panel (10 screws, the panel 4 by 7 inches on the front of the combustion chamber. If the gasket goes to pieces, replace it with Monitor part number 6850, about $16). The flame rod is to the right and below the opening. Use a flashlight to see where it is, between the burn chamber wall and the burn ring. In this half inch opening, it should be centered. If there is carbon build up (a carbon bridge) from the rod to either side, the heater will shut down. If the burn ring is very near the rod, it may touch it as the heater warms up, and the heater will shut down.
How does the flame rod work? It conducts electrical current through the flame itself to the board, telling the control circuit the flame is present and all is well. If the rod shorts out by carbon, or by touching the metal on either side, the signal to the control circuit is that all is not well, and the board responds by shutting the heater down.
The burn ring, or combustion ring, looks like a cereal bowl upside down in the middle of the heater. It is stainless steel, and glows red hot in heater operation. New, it starts out perfectly round, but may warp over time. If the warp is wide at the flame rod position, and touches the rod, that condition can shut down the heater.Leave a comment:
-
I also found this write up on somebody's website. Here it is, and the link if you want to check it out yourself.
Your Monitor heater is an amazing piece of equipment, working automatically year in and year out, until something develops or goes wrong. (Monitor says a unit should be serviced every three years) When something goes wrong, the heater itself is usually the first to know, and shuts itself off. There are a number of relatively simple things that can tell it to shut down, or prevent it from starting. Resolving these Level One issues is not complicated, and does not require a major rebuild. If you (or someone you can recruit) are mechanically inclined and have the ability to learn, you can
1Learn to know your Monitor heater better, and
2Handle the simple problems without a $100 to $300 service call
This article is designed to assist you in becoming better acquainted with your Monitor oil heater, building a comfortable relationship that will last through the years. Become friends instead of enemies; cooperate instead of fight to make it work. If you never take your heater apart, this printed information will help you understand what is going on behind the panels.
FORWARD@@@
This writing is not intended to be strictly a technical manual, although we place a very high value on accuracy. The format is more like a discussion at the neighborhood coffee shop; and in fact mirrors what I would tell you personally in such a setting. It also follows the lines of what I tell Monitor oil heater owners when I do repairs in their homes. This information is not “trade secrets” and I do not feel I am undermining my own service work by sharing such information. The more the owner knows about the mechanical devices that surround him or her, the better they will get along. If the owner would rather someone else take care of the details, then let them call a service tech. And they do. I am a very busy man. If you are curious, and inclined to “do it yourself,” then there are a lot of things you can check and resolve without getting in “over your head.”
@@@
Not everyone should start taking apart a Monitor heater. However, if you are mechanically inclined, know one end of a screwdriver from the other, and are very interested in your Monitor heater, you could save a $100 to $300 repair bill for another day.
There are several simple conditions that can cause a Monitor heater to interrupt itself, shut down and stop working. Resolving these Level One issues is not complicated, and does not require a major rebuild.
Level One Repairs: Minimum difficulty, few parts.
Level Two Repairs: Moderate difficulty, internal, parts required.
Level Three Repairs: Major rebuild of combustion chamber.
What if I need parts? Most of the Level One repairs require no parts; when we get to Level Two repairs, I provide the Monitor Part Numbers and current approximate cost. Monitor parts can be obtained from Monitor dealers and service agencies, as well as
When major repairs are needed, there is no substitute for a trained, experienced, and diligent Monitor service technician. Monitor’s US distributor program headquarters is in New Jersey, including a national service manager. This is the source of accurate, reliable and factory authorized training. It is provided to Monitor dealer service technicians through heater distributors across the US.
As with all electrical equipment, move cautiously around these components. A good practice is to pull the plug from the wall outlet before working on the heater. By the time your screwdriver or cleaning brush touches and sparks something, it is too late to avoid an expensive repair, if not an injury.
Say Ahhh. Open up your heater and take a careful look. The front panel and grill must come off. Use a Phillips screwdriver, find the right screws, and keep them in a safe place as you remove them (a magnet is very handy for keeping them from rolling under the heater). A vacuum cleaner will be handy for the accumulation of otherwise invisible airborne dust. A soft brush (dry, clean 2” paintbrush) can reach better than the vacuum tool. Vacuum rule number one: Do not vacuum up the loose screws!
Breathe deeply. Technically speaking, your Monitor heater is not a living thing, but it is a breathing thing. Not the breath of life, but the breath of intake and exhaust. This is an important personal comfort item for Monitor and other Direct Vent (DV) heaters: They do not steal any of your room air to operate. For decades, every oil, gas, and wood stove in a house consumed some of your room oxygen to feed their own fire. Not so with a Monitor heater; it gets the fresh air it needs from outside, and of course, the exhaust goes outside too.
Look at the exhaust pipe that is visible on the outside of your house. The smaller, center pipe is the exhaust pipe. Around it, a larger pipe allows fresh air into the heater for combustion. Because the air flows in around the exhaust pipe, it is pre-warmed along the way, during normal operation. When your heater starts up, it goes through a sequence of functions before it builds a fire. First of all (and you can listen for this), the combustion fan starts and does its job of bringing fresh air into the combustion chamber. At this point, the exhaust is the same temperature as the air going in (no fire, no heat – yet). You can safely put your hand near the exhaust and feel the air coming out. There is a pretty significant flow. This observable fact can help you identify a simple problem that can stop or prevent your heater from operating. If there is no detectable air flow, your heater will try to start but not succeed. It shuts itself down, rather than suffocate.
What can stop the air flow? If you can hear the combustion fan running normally, then it is likely an obstruction has entered the air intake/exhaust piping. This symptom most often occurs at the start of heating season, after a summer of inactivity. A pilot light would have kept insects out, but the Monitor has no pilot; it lights fuel with a ceramic igniter. Mud dabbing yellow jacket wasps can set up house keeping while we were not using the heater. A strong flashlight may reveal their work, but not always. Sneaky little creatures, they can crawl the length of the exhaust pipe to the first corner, and build a mud home that can block the exhaust. Paper wasps, too, can choose your pipe as an opportunity. Suppose the heater has been operating well, and suddenly stops the exhaust air flow it once had? An oak leaf, slightly curved, can follow the flow into the air intake, slide along between the pipes to the air hose inside the building. If the leaf is just the right size, it can act as an air dam (just like a closed door), blocking the air flow. A mouse could do the same job, if determined enough. Mosquitoes and gnats are regularly found inside the air intake passages, but they collect at the low spot and appear to do no harm. A shop rag or beach towel hanging on the exhaust could become an obstruction, if it doesn’t get a burn hole first. Keep the exhaust pipe clear of any obstructions.
Looking things over. Fuel comes into the heater from the rear, on the right. A pint sized metal bowl is the sump, and the solenoid pump sticks up from the sump. This assembly is the Constant Level mechanism. A small copper line goes from the sump up and across the front of things to enter the combustion chamber. Electric lines go to a protected cover with insulated wires at the lower left of the combustion chamber: this is the ignitor. Inside, the ignitor gets red hot when operating. On the outside, heat will be noticeable to the touch. A single wire connects to a rod entering the combustion chamber just to the right of the inspection window. This is the flame rod, and tells the circuit board what’s cooking in the chamber.
Last edited by Troy; 11-17-2009, 01:04 PM.Leave a comment:
Leave a comment: